How to fit a Kenwood Chef A701A gearbox conversion kit
|
This web page deals with fitting a direct-drive conversion kit to the Kenwood Chef A701A model, which removes the "clutch dog" mechanism.
It should be read alongside my main page on the Chef gearbox which includes sections on:
- Fault diagnosis.
- Parts suppliers.
- Service agents.
- Advice sites.
- The Service Manual.
- Dismantling and re-assembling the gearbox.
You should realise that fitting this kit is not simple and should look through this guide to see what you would be letting yourself in for.
This guide to the different models will help with identifying which one you have. However, be careful, since even the same model number can have major differences.
I've shown parts descriptions in italics below to help you order anything you need. I suggest you look through the notes below and on my main page to see what you need to order, before starting to dismantle your mixer. There are a variety of names used for some parts. I've quoted the Kenwood name for the parts first (where known).
I'm told that "The new intermediate and penultimate gears, which need to be fitted as part of an A701 gearbox direct drive conversion, come with four shims. Two of these are flat, and the other two are curved spring washers. The curved washers need to go on the bottom half of the gearbox (so they curve upwards in the middle) and the flat shim washers go on top."
You may find it easier to remove the gearbox before starting work on it. My "gearbox" page will help with this.
If you find anything to add to this page (or correct it), please let me know - see the end of this page for contact details.
N.B. This web page is only intended to help you work on your Chef, but I don't take any responsibility for any damage or injuries which result.
|
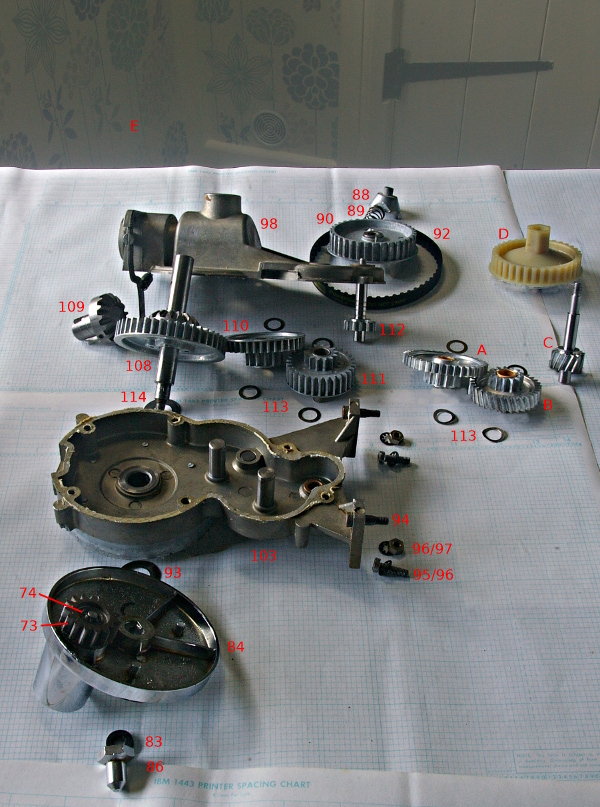
Exploded diagram of Kenwood gearbox with TDA part numbers.
Check the parts with the Service manual (see my Gearbox page) before ordering - especially the "assemblies".
This shows the new parts required for the conversion, and those being replaced - in bold.
- 73 #183644 Planet gear (metal) with mounting shoulder
- 74 #199459 Push-on fastener
- 83 #203705 Planet hub washer
- 84 #182743 Planet hub and bearing
- 86 #182810 Planet hub nut
- 88 #177023 Clutch dog
- 89 #177530 Clutch dog spring
- 90 #177463 Large pulley assembly (now glass-fibre filled nylon)
- 92 #197920 for metal gear Timing belt
- 92 #197944 for nylon gear Timing belt
- 94 #178089 Special screw
- 95 #196043 Screw 2BA x 5/8"
- 96 #203731 Lock washer
- 97 #205052 Nut 2BA
- 98 #177334 Top cover assembly
- 103 #182482 Body assembly
- 108 #177384 Vertical drive shaft assembly
- 109 #177425 Output shaft assembly
- 110 #177449 Penultimate gear and pinion assembly
- 111 #177451 Intermediate gear and pinion assembly
- 112 #185769 Drive pinion assembly (metal gear)
- 113 #204436 Shim washer
- 114 #204448 Shim washer
- A to D Direct drive conversion kit comprising:
- A and B #KW650130 Intermediate and penultimate gears
- C #KW696574 Drive pinion assembly
- D #KW696586 Large pully (M6 nut)
|
|
|
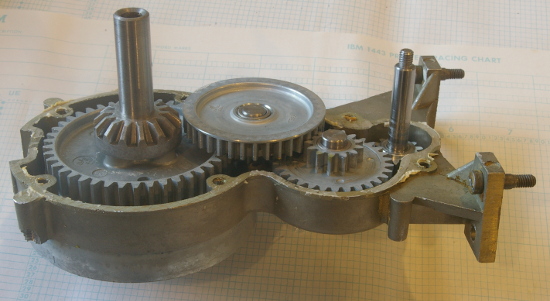
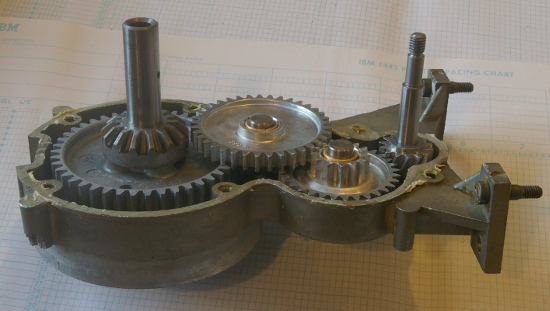
These show the gears before and after conversion.
You can see how much taller the replacement drive pinion gear is. The gearbox cover cannot be refitted until this height is adjusted. The height is critical since you may crack the cover if you fasten it down without correct adjustment of the gear (plus it would certainly overheat and cause wear).
The cog is fitted tightly on the shaft but needs to be raised to allow this, since there is space below the bottom of the shaft.
The cog needs to be 10mm from the bottom of the gear to the bottom of the shaft.
See below for how to make the adjustment.
It is much easier to make all the adjustments before greasing the gearbox.
|
|
|
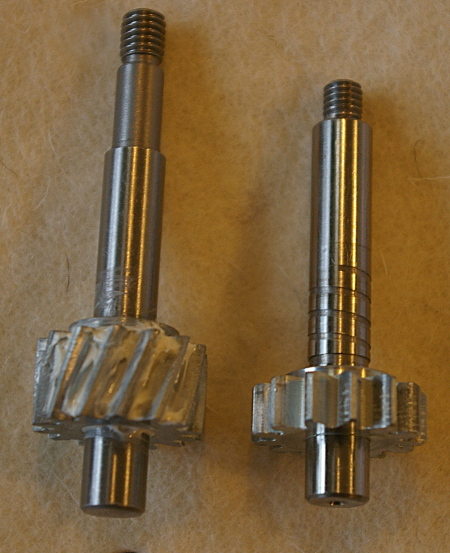
This image shows the differences between the new and old gears.
|
|
|
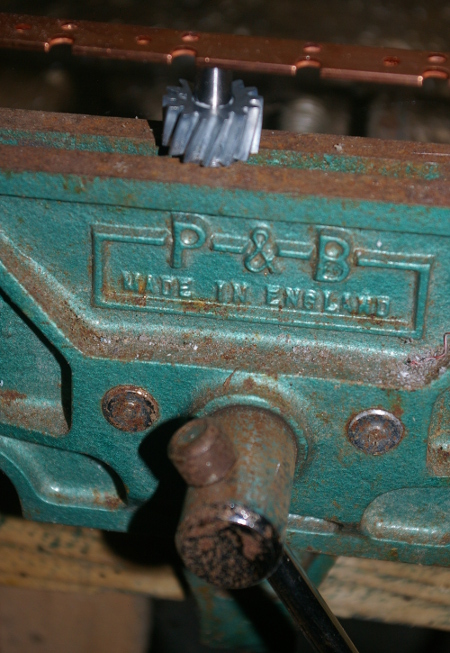
This shows how to adjust the level of the gear on the drive pinion.
Rest the gear in a vice with the jaws just loose on the shaft.
If you don't have a vice (!) then you could drill a hole, the size of the shaft, in a piece of dense hardwood and then rest the gear in that.
Hit the top with a copper hammer (or with a normal hammer via a piece of copper as in the image) until the correct level is reached. Hitting exactly vertically and using copper should prevent damage to the shaft.
Now refit the pinion gear in the gearbox to check there is clearance between it and the top cover. The gear should be able to move up and down by a very small amount, once the gearbox is reassembled.
|
|
|
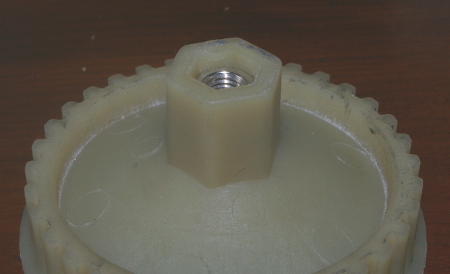
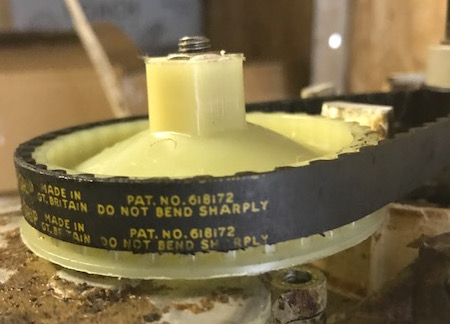
The top of the large pulley needs reducing in height since it will foul the gearbox cover.
You will need to try fitting the cover to determine how much needs to be taken off its top.
I needed to saw mine off at the level of the top of the nut.
It's quite tough material so be careful - just filing it down does not seem to work.
The two pictures show before and after ("after" image by David Hallas).
|
|
|
Now you will need to pull out the pin on the liquidiser cover before the cover will fit back into place.
|
Please let me know if the above helped, or if you found any mistakes (see below).
This page last updated 23rd. October 2020.
Images and text © Copyright Jim Batten, 2014-2020 except where stated above.
Send corrections, comments, enquiries, etc. to Jim Batten