How to repair a Sanivite 3 with a few tips on installation and maintenance
|
For those with other models of Sanivite than the 3, note that there are some differences but many similarities, so this page may still help. It is also marketed under different model names, eg Sanibroy.
The Sanishower is a differently-arranged and smaller unit with only two inlets, but has some parts in common with the Sanivite and so this page may help.
If you are only trying to deal with a smell or noise, or just want to thoroughly clean a Sanivite 3, then start with the section "And in future..." below. If that doesn't solve it and you need to open it up, ignore the diagnostic bits and just follow the description of opening, cleaning and re-assembling below, starting at "Disconnect unit for removal".
If you are starting to install a Sanivite 3, then see the items in orange below, plus the section about Re-installation at the end.
If it's failing in some way, read on... but if you are in any doubt about your abilities then call a local Service Agent rather than risk killing off your Sanivite.
Before doing anything else.
As soon as possible, disconnect the Sanivite from the mains - BUT note if it's buzzing first.
If you have multiple Sanivites sharing the outflow pipework then switch them off as well to prevent them pumping water back down the pipe to the unit you're working on.
Leave notes on all the sinks, showers, etc. served by your unit(s) to say not to use them.
When installing, you can wire it to a Fused Connection Unit, but it's a lot easier to sort out problems if it's simply wired to a socket via a plug with the appropriate fuse.
Possible problems.
- Power -
I realise that this should be obvious but it's worth checking it's still plugged in and that there's power getting through to the Sanivite - before you open it up.
- Outflow pipe run blocked -
If the problem is just caused by the outflow pipe run being blocked, then there will be loads of back-pressure caused by the Sanivite motor pumping as hard as it can against the pressure.
Obviously, if it's freezing outside, then it is likely that water in some of the outside pipe runs has frozen. It's a bit late but you could consider lagging near-horizontal runs where possible. A temporary fix would be to open up the first outside drain point and let the Sanivite pump into a bucket, etc.
This will also be apparent in different ways -
- There's a good chance of water backing up in the sink or other items which feed into the Sanivite.
If you are there shortly after the problem starts then the pressure will not have had a chance to release and there will probably be sprays of water coming out of outlet connections and / or water forcing its way up out of the breather.
- If it's been a while since the problem started then the pressure may have mostly eased.
You should have a drain valve on the outflow near the unit. This can be gradually opened to release the head of water from the vertical outflow. There should be enough water here to have filled the upwards pipe run. I make it there should be around a litre per metre of 36mm pipe (two pints per yard of inch and a half pipe).
- the motor failing to start -
One sign of this is a buzzing noise when power is on. In this case, leaving the unit powered down allowing it to cool down may allow it to reset itself and carry on. The thermal cut-out on the motor can take an hour to reset.
If not, then you are going to need to open it up to sort this out.
Another sign of this is water backing up in the sink, etc. which feed into the Sanivite.
- Outflow non-return valve blocked or faulty -
If it pumps and then shortly afterwards pumps again and again then it's probably only the outflow non-return valve which is blocked. You should be able to drain the Sanivite down, disconnect the outflow and just clean it out. Do note the advice in Step C3 below though.
- Micro-switch sticking or microswitch cover membrane worn out / gunged up -
Sometimes these will cause it to keep pumping even when there's nothing left to pump. You'll need to go through the opening and cleaning-out steps below.
- Further help in diagnosis / repair -
- Searching for information is made more tricky because the Sanivite is called a whole range of names in different countries.
- There's lots more help at fixed4free.com
- How to Mend It.com is a good site for help - just search for "Sanivite". I've listed some extracts from their pages further down relating to motor problems.
- YouTube only seemed to cover installation of the Sanivite when I last looked, but this guide to the "Haushaltspumpe" does include a cut-away view of the Sanivite at the start.
- Obviously, you'll have tried a reliable Search Engine like DuckDuckGo, rather than Google (which probably has a camera watching you right now).
Tests in place.
The first thing to test is to see that the whole run of outlet pipe(s) are clear. You may not have to move the Sanivite for this.
If you are the lucky owner of a multiple Sanivite system where the end of the outflow pipes join together, then you can try the following:
- Switch off all the other Sanivites.
- Block off the outflow after the pipes have joined together.
- Make sure the outflow drain on the problem unit is open and drained down.
- Now you can run the other Sanivite and see if water from it forces its way back up the pipework and down to your unit. Be prepared to catch said water when it arrives in bulk at the outlet.
If this works then you know the outflow run between these two units is clear enough to work.
Be careful.
When testing the unit, make sure the mains connection has not got wet before re-connecting it.
Disconnect unit for removal.
For all the following, the reference numbers relate to the Saniflo diagram.
First off, mark (waterproof ink!) exactly where the unit fits, then undo the (possibly two) screws which lock the unit down to whatever supports it.
|
Step A1 - drain.
Try to drain it as much as possible in situ.
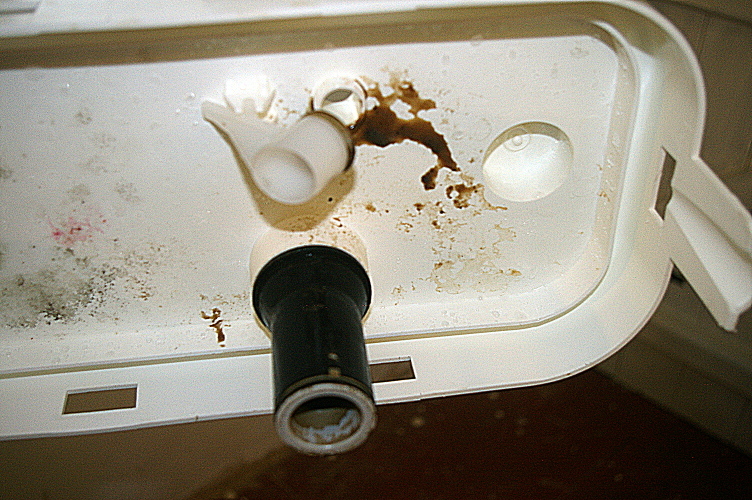
Any capped-off end outlets (37) can be undone and the blocking-cap eased off. This then gives access to a non-return valve (32) which can be pushed in with a screwdriver, etc. That will release a load of mucky water which you will need to catch with some sort of high-tech system as shown in the picture.
Connected end outlets can be detached and drained in a similar way.
Now undo the Jubilee clips (28, 30, 30c) and / or plastic clips (30a, 30b) on the various connections. The plastic clips (if yours has that sort) can be released by pushing the two ends apart sideways with pliers, etc. If these break you can replace them with the same size in Jubilee clips - available at most hardware stores.
Now ease the unit clear.
|
|
|
Step A2 - Pipes clear?
At this stage you can see into the inlet and outflow pipes which should give some idea of how gunged-up they are. The Sanivite installation guide, page 2, diagram 7 shows a sensible spot for a drain plug on the outflow pipe which enable most of it to be cleaned out with little difficulty. It's a good idea to avoid hiding this behind panelling, etc.
The simplest way to check to see if the outflow pipes are blocked is now to blow through the pipe. I'll leave you to work out how to do this given that you are not fitted with a trunk and that you don't want to put your mouth directly on the noxious pipe.
|
|
Step A3 - Removing the lid.
Firstly, note that you do not need to worry about the top rubber outlet (8) connector at this stage - it should pull out as part of the lid.
The lid (2a) is held down by the six clips on the sides and the end, by a rubber seal (2b) around the inside, and by lots of internal pressure.
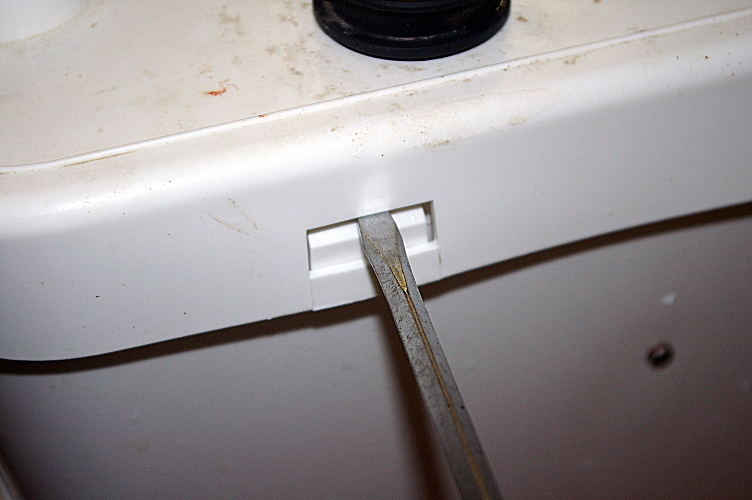
Pull out the bottom edges of the lid to release each clip - CAREFULLY or you'll snap the plastic of the lid.
Now pull the lid upwards, starting at the ends. You'll need to pull evenly and hard - but preferably without breaking the lid in half.
You may need a flat-headed screwdriver to help - GENTLY - by slotting it in between the top of each clip and the lid; then gently using it to ease each in turn.
|
|
|
Step A4 - Cleaning out the gunge.
Make certain that you've disconnected the unit from the mains as cleaning may allow it to restart and hose you down instead.
The lid can be hosed down but watch out for the overflow valve (24) which is easily damaged but needs wiping clean.
|
|
|
Firstly, hose it out whilst using a brush to get rid of the worst. Then empty it away somewhere appropriate. Two or three rinses will help.
Keep an eye out for lost bits whilst doing this - especially the rubber feet (56).
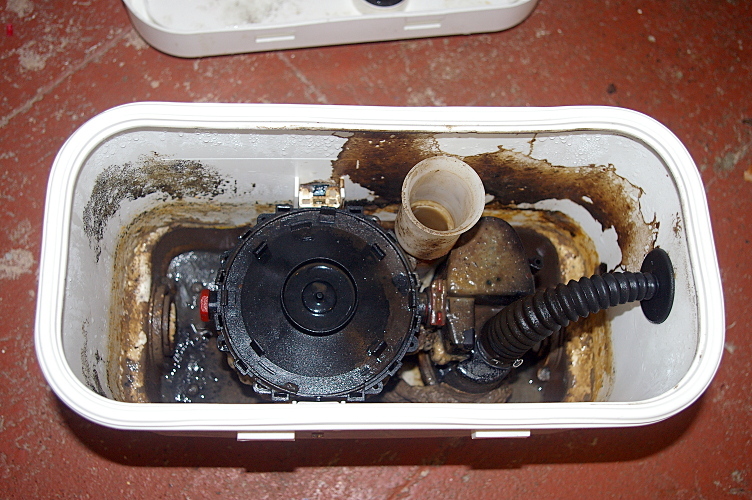
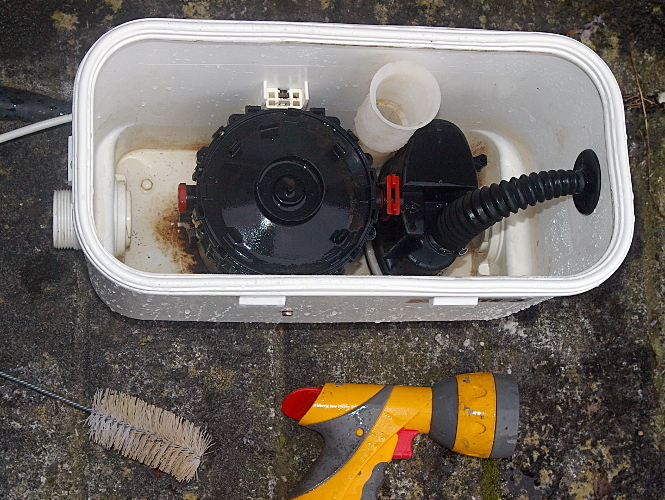
Here is mine, before hosing, showing the level of gunge to expect.
|
|
|
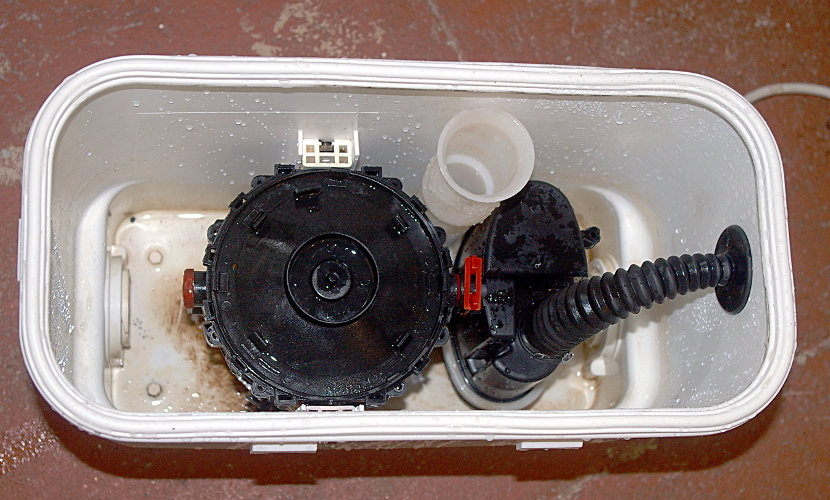
Here it is, after hosing and brushing.
|
|
|
Secondly, pour in around ten pints of hot water mixed with washing soda (a "mild" solution). Be carefull not to get this in your eyes or on anyone else.
Agitate this "marinade" every so often whilst it stands for an hour or so - well away from children and animals!.
Pour it away down a suitable drain and rinse the unit with clean water.
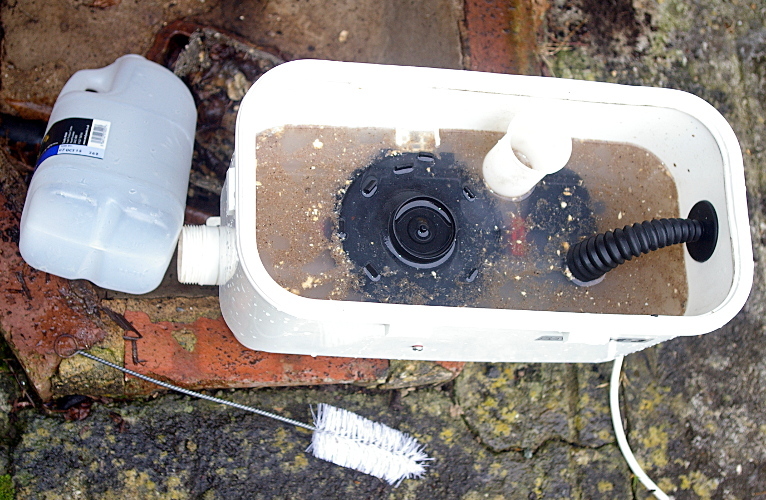
Here it is whilst soaking.
|
|
|
Now give it another hosing and brushing with clean water.
This is how mine looked after the process.
|
|
|
Step A5 - Clean the connectors.
You've cleaned the unit but the condition of the connectors is equally important when reassembling. Give them all a good clean through using hot water with washing-up liquid and then bleach or washing soda.
If used in the previous assembly, you will need to clean off, or pull away, any sealant that was used.
|
|
Step A5a - Check it out.
Whilst you have the unit accessible, inspect the flexible diaphragm below the microswitch. The diaphragm must be flexible and un-distorted in order to work the microswitch reliably. Best to replace it if it's going home.
|
|
Step A6 - Test to see if it now works.
Put it somewhere which won't mind being drenched and where you can get at a mains connection.
Fill it with fresh water above the level of the motor.
Make sure it's aiming a bit away from you and where any spray will not get acquainted with your mains connection.
|
|
|
Re-connect and see if it works.
If so, shout "Hurrah!". It was probably just suffering from gunge-on-the-micro-switch-housing (a condition not covered by the National Health Service) which was cleared by the cleaning.
In this case, see the section below on re-assembly.
|
|
|
If not, that's as far as I've had to go so far in problem fixing and this guide continues with re-assembly and re-fitting.
This page at fixed4free.com has loads more information.
The following are extracts from other notes which may help if yours is still defunct.
Obviously, I can't say how wise or accurate they are.
-
sanivite 3 is buzzing after pipework froze and w/m pumped water over the floor
Turn the machine off NOW. leave it to cool down if your lucky it will reset if not you will have to replace the motor start capacitor you can buy one from 01905 420170 and if that wont fix the machine I am afraid you will have to buy a new one allways turn the machine off it has a limited run time before it reaches the critical temprature and the thermister inside the windings cuts out !!
- How can I fix my Sanivite 3 as it's not pumping out the water..which stopped working mid flow?
A feignt buzzing indicates that either there is a blockage preventing the impellor from rotating or the motor start capacitor has blown due to constantly overloading the machine.
If on checking there is no blockage then without telling you to pop off to maplins and buy a 12 mf 440v ac motor start capacitor for a few pounds and installing it in the machine you will have to get a saniflo service engineer in
- How to change a capacitor in a sanivite pump?
The Sanivite motor is of the induction type and there are no brushes to wear out nor can you open the motor assembly, If the machine has been installed in such a way as to cause the machine to overload or opperated with incorrect pipework or leaking non return valve the Motor start capacitor will eventually blow and the machine will hum. Isolate Machine from the Electrical supply remove the motor pump assembly from the box after giving it all a good clean up turn it upsidedown remove the pump cover plate it turns do not prise it off !!! to expose the impellor Push the membrane down a few times if you hear a clear clicking sound the Cherry Microswitch is working correctly and when the electric is turned on the motor will hum Now spin the impellor with a SCREWDRIVER (dont use your fingers it will take your nails off I know) if the motor runs up replace the motor start capacitor either from Saniflow Spares in the UK 01905 723746 or from Maplins or Radio spares a 10mf or 12mf in-fact any motor start capacitor of the same physical size and roughly the same rating will be work the lower the Microfarrads the longer the run time is if you go to low the machine will run backwards as did early Sanivite machines. Replace the membrane seal it with Red hermatite or Evostick contact adheasive lining up the line on the membrane with the line on the electrical chamber,silicone sealant works but takes longer to cure.
What ever you Do Not take the motor apart or you will wreck the machine and isolate it from the electric.
- This one is for the with-macerator model but may help - Sani plus toilet stop working today, I could hear the motor making a noise but the blades don't seem to move
if the motor is humming but the blade is not turning carefully give it a spin with a screwdriver blade if it then runs up it's the capacitor that's gone & needs replacing.
You can take the motor apart I have been doing it for 25 years now, just lift the tabs, it is oil filled, will make a serious mess every where and can be really hard to get back together so its easier to say it's not possible to take apart.
The bearings are 608 open seal skate board / roller skate bearings with 4 back to back standard shaft seals keeping the oil in.
Basically if the motor turns freely without power applied but hums & wont with power applied either the Capacitor has blown or the motor is bust no point in digging any further into the machine you need a new one !
- And more, for the same query -
After checking that there are no blockages preventing the cutter impeller from spinning freely connect up the electric to the motor, push the rubber membrane up or stand it on a small screw driver to hold the switch on and the if motor is humming quickly spin the impeller or cutting head carefully with a screwdriver if the machine starts and sounds ok run it for 5 min or so from cold (time it)
if it still sounds ok replace the cap with a 10 - 12mf 440 volt ac cap from Maplin or RS a 10,12,14,15mf all work.
If the motor sounds like a buscuit tin full of marbles replace the machine.
|
|
Step C1 - Re-fit the whole thing.
Before doing anything else, make sure you've re-fitted and tightened all those helpful access plugs you thought to fit on the outlet pipe run. They're easy to forget and lead to interesting "water features" if left out.
Now, give the unit, rubber seal and lid a last clean.
Re-fit the innards - sorry, I didn't need to do this so I can't help with this. If anyone out there has done this, please let me know if there's any tricky bits worth telling everyone.
|
|
Step C2 - Re-fit the lid as follows.
The rubber seal pushes back down on the lip of the base quite easily.
Getting the lid back on is another matter and needs a plumber's trick to help.
Find your friendly local washing-up liquid and pour some in a saucer. Dip in a finger and wipe it (generously) around both sides, and all round, the rubber seal.
Rub some more inside the top of the outlet tube (8).
Now make sure the lid is the correct way round (sticking-out bit should be over the wiring connector) and lower it onto the unit. You will need to line up the outlet tube (8) with the bit in the lid (30c perhaps).
Then push the lid down onto the rubber seal, keeping it level at the start.
This is now somewhat of a battle and requires you to use quite a lot of force around the lid to get it far enough down for the clips to spring into place.
Re-fit the rubber feet (56) which came off when you were cleaning the unit. Since all the stick will have evaporated by now you can use silicone to hold them in place. If you don't have any you can always wait 'till the unit is back in place and then slip one under each corner (before screwing it down).
|
|
Step C3 - Re-installation.
Push in the non-return valve / elbow (21c) using washing-up liquid as before. Leave the bottom Jubilee clip for now as the whole of this part needs to turn to align with the outflow pipes.
However, on some models, the non-return valve on the outflow can rotate separately from the pipe connector. See diagram "d" in the Sanivite installation leaflet to make sure yours hasn't been misaligned before refitting.
|
|
|
Re-fit the breather cover (26).
N.B. This may have had a charcoal filter.
|
|
|
Now give the inlet pipe ends a clean and make sure all the Jubilee clips are in place.
The outflow connections are the most critical of the whole thing since they're under high pressure when the waste water is pumped into the pipe. I found that I could only stop mine leaking (with a fine spray) by adding a sealant around the sealing surfaces. I recommend getting a tube of Fernox LSX for this purpose, available from most builders merchants. Be carefull you don't use so much that it partially blocks the pipes. A thin smear is all that's needed - all around the joint. Wipe off any excess after assembly using a paper tissue. Once assembled using this, wait the couple of hours needed for it to cure.
Use some more washing-up liquid on the inside of the other connections to make re-fitting them easier.
Put the unit back in place and connect up all the inlet and outflow pipes. You can use the marks you made earlier to check it's gone back correctly. Do up the Jubilee clips, etc.
Re-fit the (possibly two) screws which anchored it down.
|
|
Finally, have a last check to make sure all the drain plugs and connectors are re-fitted and tightened up.
You need to be aware that there's lots of pressure built up in the outlet by the pump and, if the outlet pipes are actually blocked, then the water will find it's way out somewhere.
Anyway, now re-connect to the mains and test by running clean water down your sink.
If it runs briefly, then stops with water escaping from REALLY well-done-up and water-tight outflow connectors, TURN OFF immediately, shout "Oh dear!" and then go back to the top of this page. You've presumably got blocked outflow pipes.
On mine the second attempt at re-connection seemed OK and then some water was forced up around the base of the outlet pipe. I left it for a few days and this appears to have stopped. It therefore seems worth leaving this for a while if yours does the same.
If all's working well, give it enough water for a few more tries and then you're done.
Now clean up in general since the gunge from the unit / pipes and the cleaning liquids are all toxic.
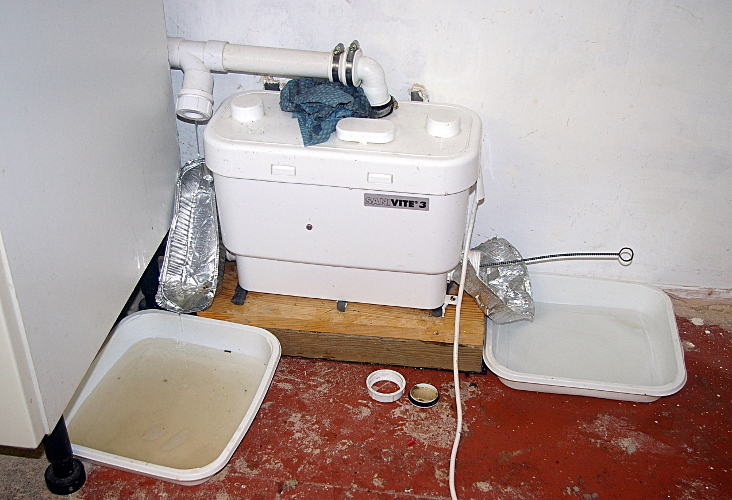
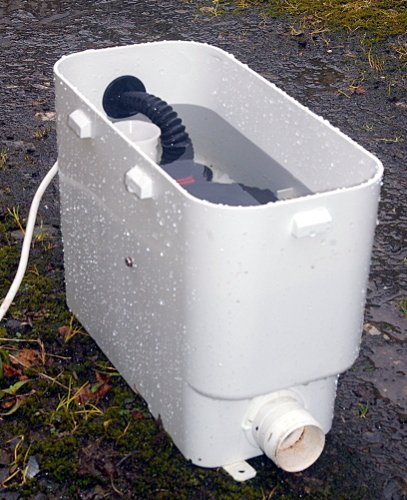
Here's mine all re-installed and working.
|
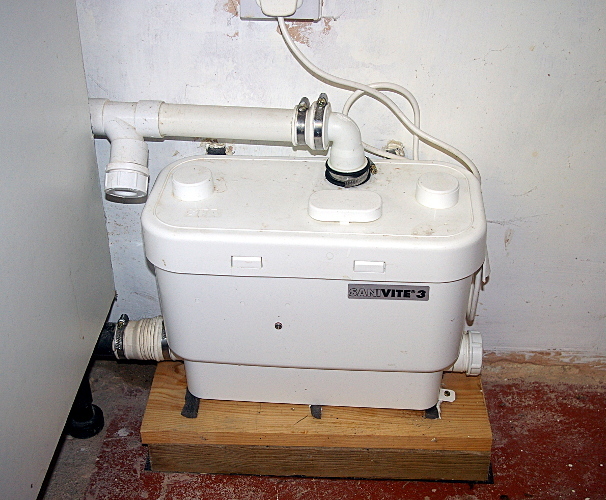
.For installation, note the base which raises the Sanivite thus easing draining down and giving a bit less height for it to pump.
|
|
Step C4 - And in future....
We are all going to remember to avoid it gunging-up again, aren't we?
- Avoid too much gunge -
Try not to put stuff down the sink which will tax the poor thing. I haven't found any rules about what should be avoided but a strainer to catch sizeable solids seems a good idea.
- Regular cleaning -
Firstly, note that the Sanivite leaves a pint or so of water when it "empties". It will then need about nine pints added to fill it enough to clean the mechanisms.
Secondly, note that the advice in the following paragraph is probably not appropriate if your Sanivite feeds out into a septic tank - but the Saniflo Descaler Cleanser, mentioned in the paragraph after, is claimed to be OK to use.
On a regular basis (every three to six months), switch off the unit and then pour about 9 pints of hot water into your sink and mix in some bleach or vinegar or wasing soda (soda crystals). Let this run into the Sanivite and sit there for a while.
Probably best to put a note on your sink, etc. to say "Don't use until the Sanivite is switched on again".
Make sure no liquid came up out of the vent and, if it did, clean it up.
Alternatively you can use the official Saniflo Descaler Cleanser. This may be expensive but there's lots of recommendations for how effective it is. I've found that one of my local plumbers' merchants is cheaper than Amazon for this, even if it's not listed on their web site. Users warn that, once opened, you need to remove the red ring on the neck of the bottle or it will drop into the system.
- Watch the weather -
It is also worth remembering to keep an eye on your system when it's freezing outside - in case the outflow runs freeze and block up.
|
.
This page last updated 16th. August 2020.
Images and text © Copyright Jim Batten, 2015-2020.
Send corrections, comments, enquiries, etc. to Jim Batten